Showing posts with label cake. Show all posts

Wednesday, September 16, 2015

Triple -Layer White Cake With Orange Curd Filling And Frosting


This delicious cake is what I baked to celebrate our 15th wedding anniversary. This cake is refreshing and delicious. If you are an orange lover you are gonna love this.
Ingredients:
Frosting
3 cups Heavy whipping cream
1 tsp Orange extract
3/4 cup Powdered sugar
2 1/2 cups Orange curd I used store bought
Method:
Using both a chilled bowl and chilled beaters, beat the cream until frothy.
Add the icing sugar and extract gradually while beating.
Whip until light and a thick enough consistency to spread as an icing. Mix in 1/4 cup of orange curd to the whipped cream. If you want to stabilize the cream add 1 tsp of bloomed gelatin to it 
Use immediately.
Cake
2 3/4 cups cake flour
1 1/4 cups plus 2/3 cup sugar
3/4 teaspoon baking powder
1/2 teaspoon salt
3/4 cup vegetable oil
4 large egg yolks
6 tablespoons sour cream
1/2 cup plus 1 tablespoon whole milk
2 teaspoons grated orange peel
1 1/2 teaspoons vanilla extract
6 large egg whites

Method:
For cake:
Preheat oven to 350°F. Butter and flour three 9-inch-diameter cake pans with 1 1/2-inch-high sides. Sift flour, 1 1/4 cups sugar, baking powder, and salt into medium bowl. Whisk oil and egg yolks in large bowl until well blended. Whisk in sour cream, then milk, orange peel, and vanilla. Whisk in dry ingredients in 3 additions. Using electric mixer, beat egg whites in another large bowl until soft peaks form. Gradually add remaining 2/3 cup sugar, beating until whites are stiff but not dry; fold into batter in 4 additions. Divide batter among prepared pans.

Bake cakes until tester inserted into center comes out clean, about 20 minutes. Cool cakes in pans 5 minutes. Cut around pan sides. Turn cakes out onto racks and cool completely. Place 1 cake layer, flat side up, on 8-inch tart pan bottom or platter. Spread 1 cup curd over. Top with second cake layer, flat side down. Spread 1 cup curd over. Top with third cake layer, flat side down. Cover; refrigerate assembled cake.

Monday, August 24, 2015

Rustic Chocolate Cake


Recipe Adapted from: Food Network
This chocolate cake is sinfully moist and favorable and is easy to put together. Aishwarya  turned 14 today and she wanted a chocolate cake. As I was pretty busy today I made this chocolate cake which required very little effort. Don't be put off by its rustic look.
Ingredients
Butter, for greasing the pans
1 3/4 cups all-purpose flour, plus more for pans
2 cups sugar
3/4 cups good cocoa powder
2 teaspoons baking soda
1 teaspoon baking powder
1 teaspoon kosher salt
1 cup buttermilk, shaken
1/2 cup vegetable oil
2 extra-large eggs, at room temperature
1 teaspoon pure vanilla extract
1 cup freshly brewed hot coffee
Chocolate Buttercream, recipe follows
Chocolate Frosting:
6 ounces good semisweet chocolate
1/2 pound (2 sticks) unsalted butter, at room temperature
2 tablespoon heavy cream, at room temperature
1 teaspoon pure vanilla extract
1 1/4 cups sifted confectioners' sugar
1 tablespoon instant coffee powder
Method:

Preheat the oven to 350 degrees F. Butter two 8-inch x 2-inch round cake pans. Line with parchment paper, then butter and flour the pans.

Sift the flour, sugar, cocoa, baking soda, baking powder, and salt into the bowl of an electric mixer fitted with a paddle attachment and mix on low speed until combined. In another bowl, combine the buttermilk, oil, eggs, and vanilla. With the mixer on low speed, slowly add the wet ingredients to the dry. With mixer still on low, add the coffee and stir just to combine, scraping the bottom of the bowl with a rubber spatula. Pour the batter into the prepared pans and bake for 35 to 40 minutes, until a cake tester comes out clean. Cool in the pans for 30 minutes, then turn them out onto a cooling rack and cool completely.

Place 1 layer, flat side up, on a flat plate or cake pedestal. With a knife or offset spatula, spread the top with frosting. Place the second layer on top, rounded side up, and spread the frosting evenly on the top and sides of the cake. I decorated the cake with some m&m's and dripped on some melted chocolate

Chocolate Frosting:
Chop the chocolate and place it in a heat-proof bowl set over a pan of simmering water. Stir until just melted and set aside until cooled to room temperature.

In the bowl of an electric mixer fitted with a paddle attachment, beat the butter on medium-high speed until light yellow and fluffy, about 3 minutes. Add the cream dissolved with coffee powder after slightly warming the cream and vanilla and continue beating for 3 minutes. Turn the mixer to low, gradually add the confectioners' sugar, then beat at medium speed, scraping down the bowl as necessary, until smooth and creamy.On low speed, add the chocolate to the butter mixture and mix until blended. Don't whip! Spread immediately on the cooled cake.

Tuesday, December 30, 2014

Brown Sugar Cupcakes with Browned Butter Cardamom Frosting

If you love Cardamom like I do you would love this cake and frosting. Today my friend visited with her two lovely daughters and I made a batch of this cupcakes for them.This was the only one that was remaining, that too because I saved one for Jai as he was not back from work yet. I think that itself tells you how good they were.
A brand new year is about to begin. Hope you are ready for more great experiences and adventures! Happy New Year to you all!
Ingredients:
1 cup loosely packed brown sugar
1 large egg
1 tablespoon cardamom powder
3/4 cup milk
1/2 cup unsalted butter, melted and cooled
1 1/2 cups all-purpose flour
1 1/2 teaspoons baking soda
1/4 teaspoon salt
Method:
Preheat oven to 350 degrees F. In a bowl, combine all the dry ingredients and mix well Set aside. Line a cupcake tin with liners.

In a large bowl, whisk brown sugar and egg until smooth. Add in milk, again mixing until combined. Slowly pour in melted butter, continuing to whisk. Add in the flour, soda and salt along with cardamom mixing with a large spoon until batter is smooth.

Using a 1/4 cup measure, add batter to liners. Bake for 16-19 minutes, or until tops are puffy and golden, and don’t jiggle when touched. Let cool completely.

Browned Butter Frosting

Ingredients:

1/2 cup butter
2 cups confectioners’ sugar
1 teaspoon cardamom Powder
1 1/2 to 2 tablespoons milk
1/8 tsp of salt

Method;

Melt butter in a small saucepan over medium low heat. Continue to cook, watching carefully, until butter becomes an amber color (watch carefully to avoid burning as butter changes from amber to burnt easily).  Remove from heat and allow to stand 2 to 3 minutes; do not stir so the solids can sink to the bottom of the pan.  Slowly pour the melted butter into a heat proof bowl, leaving the last 1 to 2 tablespoons of melted butter and the solids in the pan to discard later.  Allow the amber melted butter to set at room temperature 2 hours or until thickened and softly set.
Beat sugar and cardamom into soft, browned butter.  Add 1 tablespoon milk.  Gradually add an additional tablespoon of milk, about 1 teaspoon at a time, until of desired spreading consistency. Add the salt and mix well. Frost the cupcakes after they have cooled down completely.

Sunday, December 14, 2014

Zuccotto

Yesterday was the wedding of Jai's one and only niece. She is very dear to Jai and us and we very much wanted to be part of her big day. But unfortunately, we couldn't make it to the wedding. Jai and Aishwarya were so down and disappointed; so to cheer them up I made a special dinner yesterday and to top it off I had made this chocolaty delight.
Zuccotto is an Italian chilled dessert. It can be frozen, then thawed before serving. This dessert is traditionally made in a special pumpkin-shaped mold (Zuccotto means "little pumpkin" in Italian). This is an easy and  fun dessert to make and it is good. Especially if you like chocolate  this is a dessert for you.


Ingredients:
Brownie-1 qty/ Pound cake / sponge cake  
Vanilla Ice cream - 2 cups or enough to fill the cup
Kahlua-1/4 cup
Chocolate syrup/ Nutella-4tbs/ Cocoa powder
Method:
Make brownie in a jelly roll pan, or if you want you can use a store bought pound cake or sponge cake. Line a bowl with plastic wrap. Trace the bottom of the bowl and cut it out and use it to line the bottom of the bowl.( If using a pound cake /sponge cake cut  crosswise into 1/3-inch-thick slices. Cut each slice diagonally in half, forming 2 triangles and use the triangles and line the bowl with it). Now cut long strips of brownie and line the sides of the prepared bowl. Brush some of the Kahlua over the brownie or cake lining the bowl. Reserve the extra brownie. Fill the brownie lined bowl with ice cream. Brush the remaining brownie/cake slices on one side with kahlua and arrange them, kahlua side down, over the ice cream, covering the filling completely and trimming to fit if necessary. Cover  Zuccotto with plastic wrap and refrigerate at least 3 hours and up to 1 day.
Invert the cake onto a platter. Remove the bowl and the plastic wrap.Pour slightly microwaved chocolate syrup/ nutella over or  dust with cocoa powder and serve.


Sunday, November 16, 2014

Glazed Pumpkin Spice Bread


These are absolutely delicious. It is one of my favorite breads to make in fall.  I have made these for the fall season for past 5  years . This spice bread is  packed with  great flavor and is very moist.
Recipe source:Tammy's Recipes
Ingredients:
2 cups sugar
1/2 cup oil
3 eggs
1 1/2 cups canned pumpkin puree
1/2 cup freshly-squeezed orange juice
Zest of 1 orange
3 cups all-purpose flour
1 1/2 teaspoons baking powder
1 teaspoon baking soda
1/2 teaspoon ground cloves
1 teaspoon ground cinnamon
1/2 teaspoon ground nutmeg
1 teaspoon salt
Glaze ingredients:
3/4 cup powdered sugar
1 1/2 teaspoons ground cinnamon
1 teaspoon water
Method:
In a medium mixing bowl, beat sugar, oil, eggs, pumpkin, orange juice, and orange zest. Set aside. In a large mixing bowl, whisk together the remaining dry ingredients. Pour mixed wet ingredients into bowl with dry ingredients, and stir until no lumps remain.
Lightly grease and flour loaf pans or muffin pans. (This recipe will fill about 8 mini loaf pans, OR 2 regular loaf pans, OR 24 muffins.) Fill pans or muffin cups 3/4 full.Bake in a pre-heated oven at 375 degrees for about 15 minutes (muffins), 20 minutes (mini loaves), or 35 to 40 minutes (regular loaves). Check with a toothpick or fork (should come out clean).
Remove bread from pans and place on a wire rack to cool, covered with a clean towel. Mix powdered sugar and cinnamon in a small bowl. Add just enough water to make a glaze. Poke tops of bread with a fork or toothpick, and drizzle the glaze over the warm bread.
Slice bread with a thin serrated knife and serve warm, or allow bread to finish cooling, and store in a sealed bag or container.
Yield:
8 mini loaves, 2 regular loaves, or 24 muffins

Thursday, October 16, 2014

Burnt Almond Cake

It was my birthday today and as always Jai made the birthday cake.  This time as the cake was a bit lengthy and since I wanted to make sure that I get a good cake on my special day I helped him with it quite a bit (as I know he has this tendency to take for short cuts :)). Luckily, it was my day off and though I was nursing a cold, I couldn't keep myself away from all the action.
Don't be put off by the "burnt" in the name though. It is one of the yummiest cakes you would ever taste. This is considered one of the local specialties of San Jose and one of the best tasting American cakes. This is not the original recipe, but a combination of several recipes that I found online that I thought would turnout good.
Special thanks to all those bloggers who have put their recipes for this wonderful delight online.
Ingredients
For the Almond Cake:
4 extra-large egg whites
1 cup milk
2 tsp vanilla extract
1 1/2 tsp almond extract
3 cups  cake flour
1 1/2 cups granulated sugar
1 tbsp + 1 tsp baking powder
3/4 tsp salt
6 oz butter, at room temperature
Method:
To Make the Almond Cake:
Preheat the oven to 350 F. Line two 9” cake pans with parchment, and spray them with nonstick cooking spray.
In a small bowl whisk together the egg whites, 1/4 cup milk, and vanilla and almond extracts. Set aside.
In the bowl combine the flour, sugar, baking powder, and salt. Mix on low speed for 30 seconds to mix and sift the ingredients. Add the softened butter and the remaining 3/4 cup milk to the bowl, and mix on low speed until the flour is moistened. Raise the speed to medium and beat for 90 seconds.
Stop the mixer and scrape down the bottom and sides of the bowl. Add the egg white mixture in 3 parts, beating well after each addition. Scrape down the bottom and sides of the bowl once more. Divide the batter evenly between the pans.
Bake at 350 for about 25 minutes, until the tops spring back lightly when pressed. Let the cakes cool for 15 minutes, then gently invert them out of the pans, invert them again until they’re right-side up, and let them cool completely on a wire rack.
(Note: I have made this cake using a sponge cake also and it also turned out fine. So if you are not a big fan of almonds and almond essence, you can go for a plain sponge cake instead)

To Make the Caramelized Almonds/Burnt Almonds.....

In a large cast iron skillet toast 1 8oz package of sliced (not slivered) almonds.
Then sprinkle 1 Cup powdered sugar over almonds.
Stir constantly as not to burn the almonds.
Once the sugar is melted, add another 1/2 C. of powdered sugar to the almonds.
Your almonds should be brown in color and the aroma should be sweet toasted nuts.
Take off the heat and then spread on a cookie sheet lined with parchment paper to cool

Pastry Filling
Ingredients:
2 eggs
1 cup of cream
1/2 cup Milk
1/2 cup of sugar
1/2 tsp vanilla

Method:
Put all in top of double boiler and cook whisking for about 5 minutes, until it is thick and pudding like, will coat the back of the spoon, place in dish to cool for a couple of hours...put plastic wrap directly on top to prevent a skin from forming on top of the filling.....
place all ingredients in the top of a double boiler....
and cook, stirring until thick.....

or in if in a hurry you can mix 2 cup. heavy whipping cream and a small box of French Vanilla Instant pudding.

To Make the Simple Syrup:
Combine the water and sugar in a small saucepan over medium heat. Stir them together until the sugar dissolves, and heat the sugar syrup until it just starts to boil. Remove it from the heat and let it cool to room temperature. Stir in the amaretto or almond extract.

To Make the Almond Buttercream:
Ingredients:
1/2 cup all-purpose flour
1 1/2 cups milk
12 oz butter
1 1/2 cups granulated sugar (I used superfine so it dissolved quickly)
2 tsp vanilla extract
1 tsp almond extract
1/4 tsp salt

Method:
In a bowl, whisk together the flour and milk. Pour it through a fine wire mesh strainer into a medium saucepan, straining out any flour clumps. Heat the flour mixture over medium heat, whisking constantly, until it thickens. It will go from being a thin liquid to being a very thick paste. It should have the consistency of a very thick pudding when you’re done. Remove the pan from the heat, and let the flour mixture cool completely. To speed this process, put this in the freezer for a little while. Stir occasionally while the mixture cools.
Combine the butter and sugar in the bowl of a large stand mixer fitted with a whisk attachment. Beat the butter and sugar together on medium-high speed until very light and fluffy and no longer gritty, about 5-7 minutes.
Once the flour mixture is no longer warm at all, and the butter/sugar is light and fluffy, add the flour to the mixing bowl, along with the vanilla extract, almond extract, and salt. Whip together for 2-3 minutes until well-combined, light, and fluffy. If it seems to separate continue to beat it until it comes back together.
Assembly:
Using a large serrated knife, cut each cake layer in half. Place one layer on a cake cardboard (or your serving plate) and use a pastry brush to brush it generously with the simple syrup.
Scoop some buttercream into a pastry bag fitted with a 1/2-inch round tip. Pipe a ring of buttercream all along the edge of the cake round to act as a barrier and hold in the filling. Scoop 1/3 of the pastry cream onto the cake, and spread it in an even layer until it covers the cake and reaches the buttercream ring. Top the cake round with a second round, and repeat the process of brushing it with simple syrup, piping a ring of buttercream, and spreading the pastry cream in the center.
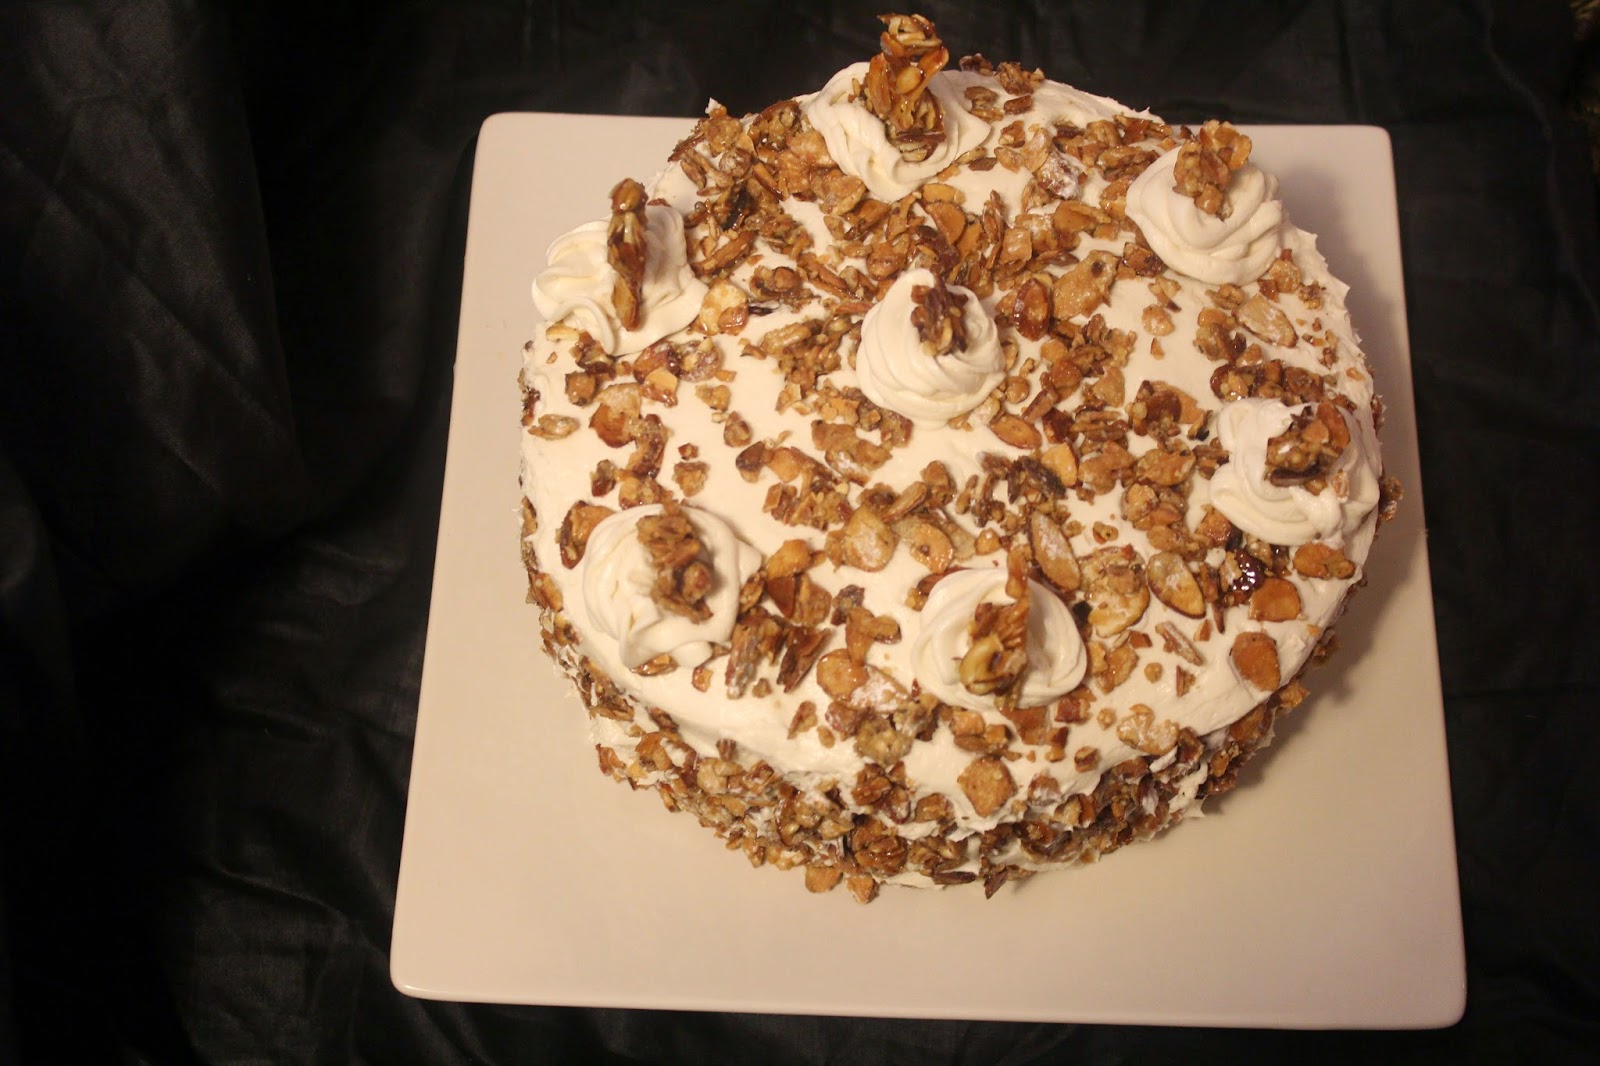
Repeat with the remaining layers, until you have a 4-layer cake with 3 layers of buttercream. Spread buttercream along the sides and top of the cake. It doesn’t have to be super-smooth since most of the surface will be covered with almonds.
Press caramelized almonds into the sides of and the top  the cake .
Fit a pastry bag with a large star tip and pipe rosettes along the top of the cake. Decorate them with more caramelized almonds, if desired.

Thursday, September 4, 2014

Fruit filled sponge cake

Today is Jay's birthday and he wanted a cake that is not overly sweet.  As mentioned earlier he doesn't like anything too sweet.  And so I thought why not make him a fruit cake with whipped cream which is sweetened to his likeness.  So here is the cake I baked, it is not too sweet and  heavy as the usual butter cream or cream cheese cakes.
As expected Jai loved his cake and  even had a second helping. So if you or your loved ones love a 'not so sweet' cake that is light and refreshing give this a try.
Happy Birthday Sweetheart !
Recipe Source: Woodland bakery
Ingredients for the cake:
Large Eggs at room temperature-4
Granulated  sugar-2 cups
Whole Milk 1 cup
Unsalted Butter 8 Tablespoons
Vanilla Extract  1 Tablespoon
All Purpose Flour -2 cups
Baking Powder -2 teaspoon
Salt -1/4 teaspoon

 Method:

In the bowl whip the room temperature eggs on high speed with the whip attachment until foamy, then gradually start adding in your sugar very slowly.

The eggs will take about 5 – 7 minutes to reach the ribbon stage, so in the meantime you can heat your milk and butter together in the microwave or on the stove top  and reserve to keep warm- you will want to add this to the mixture  while it is still warm/hot.

Also have your flour and baking powder and salt sifted together to aerate and lighten.

The ribbon stage is a stage where the egg/sugar mixture is very light in color, very thick and when lift your whip attachment and the batter runs back into the bowl it makes a ribbon effect before disappearing back into the mixture. You can also do a “figure 8″ pattern with the mixture and if it stays visible for a few seconds before disappearing you know you have achieved ribbon stage.

At this point add in all of the dry ingredients at once with the mixer OFF first  and then on low speed mix in the dry mixture.  You can gradually go up to a higher speed to make sure it is all incorporated evenly.

Next you will prepare a liaison with the hot milk and melted butter mixture. A liaison is a technique in which rather than dumping the liquids straight into the main batter causing deflating of this delicate foam we took such care to achieve;  you will take out about 2 cups of the cake batter into a separate mixing bowl, and with a hand whisk add the hot liquids to THAT 2 cups of batter.  Whisk it all together and then proceed to add this liaison to the orginal cake batter in the  bowl.

Add the vanilla extract last and pour into prepared pans.

Bake this cake at 350 degrees F for about 25 minutes, then lower the temperature to 325 F to continue baking UNTIL IT’S DONE !


The cake is done when you gently press the center and it springs back immediately.


Also, this cake recipe is a foaming egg sponge, so it is naturally going to be a DRY  cake due to very low amounts of fat in the recipe.
It lends itself nicely to having a Simple Syrup brushed on the layers to add moisture

Ingredients for the Frosting:

2 teaspoon unflavored gelatin
8 teaspoons cold water
2 cup heavy whipping cream (35%)
1/2cup sifted icing sugar (confectioners sugar)

Method:
In a small microwaveable bowl, combine gelatin and cold water; let stand until thick. Microwave the gelatin for 10 seconds,cool (do not allow it to set).
Whip the cream with the icing sugar, until slightly thick.While slowly beating, add the gelatin to whipping cream.Whip at high speed until stiff.

Final steps:
Chop up some fruits and mix it to one cup of whipping cream Remember to leave a good amount for frosting the tops and sides of your cake!!

Once your cakes have cooled, take a serrated knife and cut into each one. Take your fruit filling and begin to assemble your cakes, one layer at a time. Frost the tops and sides and decorate with fresh fruit/berries of your choice. Drizzle tops with the simple syrup. Place in fridge until ready to eat.

Sunday, August 24, 2014

Devil’s Food Layer Cake

Today Aishwarya turned thirteen and to celebrate her officially turning a teen I made this cake. This cake was super chocolatey,and so delicious. Add to that the decoration part is super easy. This tastes awesome with  a big glass of milk to go with it . If you are a chocolate fan or need a mood booster do try this out. The cake sure made me feel better, even after realizing that I was now the parent of a teenager.
Happy Birthday to my beautiful daughter! It's hard to believe that you are 13 already, I am so proud of you.  Love you to the moon and back
Recipe source: Williams Sonoma
Ingredients:
 For the cake:
1 cup boiling water
3/4 cup unsweetened natural cocoa powder
1 3/4 cups all-purpose flour
1 1/2 tsp. baking soda
1/4 tsp. fine sea salt
2 cups granulated sugar
10 Tbs. (1 1/4 sticks) unsalted butter, at room temperature
3 eggs
1 tsp. vanilla extract
1 1/4 cups buttermilk

For the chocolate frosting:
3 3/4 cups confectioners’ sugar
1 cup unsweetened natural cocoa powder
8 Tbs. (1 stick) unsalted butter, at room temperature
1 tsp. vanilla extract
1 cup heavy cream /Sour cream , or as needed

Decoration:
Maraschino cherries  as needed
Pirouette cookies
Method:
To make the cake, preheat an oven to 350°F. Lightly butter two 9-inch round cake pans. Line the bottom of each pan with a round of parchment paper. Dust the pans with flour, tapping out the excess.

In a small heatproof bowl, whisk together the boiling water and cocoa powder until smooth. Let cool completely.

In a bowl, sift together the flour, baking soda and salt. Set aside.

In a large bowl, using a handheld mixer, beat together the granulated sugar and butter on medium-high speed until the mixture is light in color and texture, about 3 minutes. Beat in the eggs, one at a time, then beat in the vanilla and the cooled cocoa mixture.

Reduce the speed to low and add the flour mixture in 3 additions, alternating with the buttermilk and beginning and ending with the flour mixture. Beat until smooth, stopping the mixer occasionally to scrape down the sides of the bowl. Divide the batter evenly between the prepared pans and smooth the tops.

Bake the cakes until they begin to pull away from the sides of the pans, 35 to 40 minutes. Transfer the pans to wire racks and let cool for 15 minutes. Run a knife around the inside of each pan to release the cake. Invert the pans onto the racks, lift off the pans and peel the parchment paper off the cakes. Turn the cakes right side up and let cool completely.

Meanwhile, make the chocolate frosting: In a bowl, sift together the confectioners’ sugar and cocoa powder. Using the mixer, beat in the butter on low speed until it is crumbly. Beat in the vanilla, then gradually beat in enough of the cream/ sour cream to make a spreadable frosting.

Place 1 cake layer, bottom side up, on a cake plate. Using an icing spatula, spread the top of the layer with a generous 1/2 cup of the frosting. Place the second layer, top side down, on top of the first layer. Frost the top and then the sides with the remaining frosting. I decorated the top with cherries and around the cake with pirouette cookies Slice the cake into thick wedges and serve. 

Sunday, May 11, 2014

Crockpot Chocolate Lava Cake Recipe

Hope all you mom's out there had a fabulous Mother's day.I sure had one with loads of love, presents and yummy food. This delicious dessert was made by Aishwarya  and Jai as part of delicious spread of dishes they made for me. I think this recipe is a keeper as you can make silky smooth molten lavas without heating up your house.This delicacy is made in a crockpot and if you are looking for a molten lava recipe without eggs this is the one. Dedicating this post to all the awesome mothers in my life. Love you all. And a big thank you to my daughter and husband for treating me like a queen today and everyday; you both make  everyday a mother's day for me.
Recipe source: Thismamaloves.com
Ingredients
1 C. Sugar + ½ C. sugar (set aside)
1 C. flour
3 Tbs. unsweetened cocoa powder + 3 Tbs. cocoa powder (set aside)
2 tsp. Baking powder
1 tsp. Salt
3 tbs. butter or margarine, melted
1 tsp. Vanilla
12 oz. chocolate chips
2 C. hot water
Method:
Using a non-stick spray grease the inside of your crockpot.
In a medium size bowl combine flour, 3 tbs. of cocoa powder, baking powder and salt. Set aside
In another bowl, combine the sugar, vanilla and melted butter. Next, slowly fold the dry mixture in and mix well.Pour the batter into your greased crockpot. Pour the 12 oz. of chocolate chips on top of the batter.
Combine your 2 cups of hot water, 3 tbs. of cocoa powder and the ½ cup of sugar you set aside earlier. Stir until the sugar is melted. Slowly pour the mixture over the top of your batter and chocolate chips
Cook for 2 hours on high and then another 2 hours on low.
Cook time may depend on your crockpot so keep an eye on it. Makes approximately 8 servings.
Serve with whipped cream or vanilla ice cream on the side. 

Wednesday, January 1, 2014

Fresh Ginger Cake

“May each day of this year be vibrant and new for you, bringing along many reasons for celebrations”. Speaking of celebrations here is a cake perfect  for  any celebration.The only problem with this cake is you wouldn't be able to stop with a single slice.Happy New year to you all!
Recipe source: Epicurious
Ingredients
4 ounces fresh ginger
1 cup mild molasses
1 cup sugar
1 cup vegetable oil
2 1/2 cups flour
1 teaspoon ground cinnamon
1/2 teaspoon ground cloves
1/2 teaspoon ground black pepper
1 cup water
2 teaspoons baking soda
2 eggs, at room temperature
Method:
Position the oven rack in the center of the oven. Preheat the oven to 350°F. Line a 9 by 3-inch round cake pan or a 9 1/2 inch spring form pan with a circle of parchment paper or a pan of your choice even muffin tin.
Peel, and puree the ginger very fine. Mix together the molasses, sugar, and oil. In another bowl, sift together the flour, cinnamon, cloves and black pepper.
Bring the water to the boil in a saucepan, stir in the baking soda, and then mix the hot water into the molasses mixture. Stir in the ginger.
Gradually whisk the dry ingredients into the batter. Add the eggs, and continue mixing until everything is thoroughly combined. Pour the batter into the prepared cake pan and bake for about 1 hour, until the top of the cake springs back lightly when pressed or a toothpick inserted into the center comes out clean. If the top of the cake browns too quickly before the cake is done, drape a piece of foil over it and continue baking.
Cool the cake for at least 30 minutes. Run a knife around the edge of the cake to loosen it from the pan. Remove the cake from the pan and peel off the parchment paper.

Sunday, December 22, 2013

Golden Rum Cake


With Christmas around the corner, if you are looking forward to baking a good cake for yourself as well as for gift-giving, this is an ideal choice. You can be guaranteed to get recipe requests for this semi-homemade creation.
Sending Christmas cheers from my family to yours..
Merry Christmas to you all!

Recipe source: Allrecipes
 Ingredients:
 1 cup chopped pecans
 1 (18.25 ounce) package yellow cake mix
 1 (3.4 ounce) package instant vanilla pudding mix
 4 eggs
 1/2 cup water
 1/2 cup vegetable oil
 1/2 cup dark rum
 1/2 cup butter
 1/4 cup water
 1 cup white sugar
 1/2 cup dark rum
Method:
Preheat oven to 325 degrees F (165 degrees C). Grease and flour a 10 inch Bundt pan or you can use small bundt pans. Sprinkle chopped nuts evenly over the bottom of the pan.
In a large bowl, combine cake mix and pudding mix. Mix in the eggs, 1/2 cup water, oil and 1/2 cup rum. Blend well. Pour batter over chopped nuts in the pan.
Bake in the preheated oven for 60 minutes, or until a toothpick inserted into the cake comes out clean.
To make the glaze: in a saucepan, combine butter, 1/4 cup water and 1 cup sugar. Bring to a boil over medium heat and continue to boil for 5 minutes, stirring constantly. Remove from heat and stir in 1/2 cup rum.After the cake cools in the pan for about ten minutes, pour the hot glaze around the edges and it goes right down the sides and soaks into the bottom (which will be the top) and the sides of the cake. I also pour some around the inner ring and then a little along the top (which will be the bottom). I let it sit about 30 minutes then invert it.

Wednesday, October 16, 2013

Classic Chocolate Layer Cake

Today is my birthday! For this birthday, Jay and Aishwarya asked me what sort of cake I would like them to make for me; and I wanted something loaded with chocolate. I had seen this recipe at Annie's Eats sometime back and had bookmarked it. So all it needed from me was to direct them to this. They made this chocolate wonder and which surely made my special day even more special.
Recipe source: Annies eats
Ingredients:
1¼ cups (6¼ oz.) all-purpose flour
1 cup (3 oz.) unsweetened cocoa powder, plus more for dusting the pans
2 tsp. instant espresso or coffee powder
1 cup boiling water
½ cup sour cream
2 tsp. vanilla extract
1 cup (2 sticks) unsalted butter, at room temperature
1¾ cups (12¼ oz.) sugar
2 large eggs, at room temperature
1 tsp. baking soda
½ tsp. salt
For the frosting:
9.5 oz. bittersweet chocolate, finely chopped
6 oz. cream cheese, at room temperature
6 tbsp. unsalted butter, at room temperature
2 cups confectioners’ sugar, sifted
4 tbsp. unsweetened Dutch-process cocoa powder
Pinch of salt
2/3 cup plus 1 tbsp. sour cream
Method:
To make the cake, preheat the oven to 350˚ F.  Butter two 8-inch x 2-inch round cake pans. Line with parchment paper, then butter and flour the pans.  In a medium bowl, combine the cocoa powder, espresso powder, and boiling water.  Whisk until smooth; set aside to cool slightly.  When cooled down a bit, whisk in the sour cream and vanilla.  Set aside.  In the bowl of an electric mixer, beat the butter on medium-high speed until smooth, about 1 minute.  Gradually blend in the sugar and whip on medium-high speed until light and fluffy, 2-3 minutes more.  Blend in the eggs one at a time.  In a medium bowl, combine the flour, baking soda, and salt; whisk to blend.

With the mixer on low speed, add the dry ingredients in three additions alternating with the sour cream mixture, beating each addition just until incorporated.  Divide the batter evenly between the prepared pans.  Bake the cake layers for about 23-27 minutes or until a toothpick inserted in the center comes out clean, rotating the pans during halfway through to ensure even baking.  Transfer the baked cake layers to a wire rack and let cool in the pans at least 30 minutes before inverting onto the rack to cool completely.

To make the frosting, melt the chocolate in a heat-proof bowl set over a pot of simmering water or microwave the chocolate for 30 seconds give a stir and microwave for another 30 seconds.Stir and now microwave at 10 second intervals till the chocolate melts.  Set aside to cool until just barely warm.  In the bowl of a stand mixer fitted with the paddle attachment, beat the cream cheese and butter on medium-high speed until pale and fluffy, about 3-4 minutes.  Gradually mix in the confectioners’ sugar, cocoa powder and salt.  Beat in the melted and cooled chocolate and then the sour cream.  Continue beating until the mixture is smooth and well blended.

To assemble the cake, place one of the cake layers on a cake board or serving platter.  Spread an even layer of the frosting over the top of the cake.  Top with the second cake layer.  Frost the top and sides of the cake again using an offset spatula or spoon for a soft, billowy appearance.  Slice and serve.

Wednesday, September 4, 2013

Mocha Mousse Brownie Torte

Today my sweetheart  turned one more year wiser. So to celebrate his birthday I made a cake putting two of his favorite desserts together.The brownie and the mocha mousse turned out to be a wonderful combination. With the brownies turning out dense and fudgy and mousse light and velvety it was indeed a match made in heaven - just like us ;)
 Happy Birthday to the best husband in the world.
Ingredients
Brownie
1 (1 oz.) envelope unflavored gelatin
1/3 cup cold water
1 1/4 cups sugar
1 tablespoon instant coffee powder
3/4 cup unsweetened cocoa powder
3 cups cold whipping cream
1/4 cup Smucker's Hot Fudge Topping
Method:
Heat oven to 350°F. Coat 9-inch spring form pan with no-stick cooking spray. Prepare brownie spread batter in prepared pan. Bake 28 to 33 minutes or until center is set. Cool completely on wire rack.
Sprinkle gelatin over cold water in small microwave-safe bowl. Let stand 2 minutes to soften. Microwave 30 seconds. Stir until gelatin is completely dissolved. Cool slightly.
Mix sugar,coffee and cocoa in large bowl. Add whipping cream . Beat with electric mixer on medium speed until stiff. Add gelatin mixture. Beat until blended. Spoon over brownie layer, spreading evenly. Chill 2 hours. Remove sides of pan.
 Place fudge topping in small heavy-duty resealable plastic bag. Seal. Microwave on High 10 seconds to soften. Knead. Cut a very small corner off bottom of bag. Drizzle evenly over chocolate mousse. Chill.

Sunday, August 25, 2013

Customizing a Store-Bought cake


Yesterday our little darling turned 12. We didn't plan a party as we already had one celebrating her upcoming birthday with her grandparents while we were vacationing in India. We gave her a surprise party on 12th which was 12 days before her real birthday and the party was at 12.00 clock. But we couldn't let her birthday pass without any celebration. As we are still in the middle of getting back to our normal routine after the trip, I thought of passing up this opportunity to whip up a cake.  For all her birthdays except the first one I had baked the birthday cake; so it was a bit difficult not to do it this time. I had to hold myself back to be practical so I went and bought a German chocolate cake (I didn't have enough time to order for a custom one at a short notice). Then to personalize it I made a paper Tardis for my die hard Whovian and placed it over the cake. If I had planned ahead I could have ordered some Dr Who merchendise and customized it but as Dr.Who  stuff is not available in the shops near where we live I had to resort to paper tardis.
Aishwarya was surprised that she got one more cake for her birthday and was all smiles when she saw how I had personalized it. She had  a lot of fun playing with the tardis after finishing with the cake ( She is still a little girl when it comes to playing with Tardis).  What I learned from this experiance is that with a little imagination it is easy to customize a store bought cake for whatever occasion you want.
Just to show how much of a Whovian she is I have included some of her sketches/paintings - these days, she eats, breaths and dreams Dr.Who trivia and bores us to death with it.
https://blogger.googleusercontent.com/img/b/R29vZ2xl/AVvXsEjitP6yynFo60NMzK6R_sxPBzj2YlpLsWMEH6lFyV3FXxM7-gskdmpGsXlH8vVsA9qDxfhi5SbTVVq91F-IExzAFE247BbMyF8AlpHbjsJq5EAODDWJ5c4NlrVx57e-zMY8TA8bqK5M30o/s1600/chibi+eleven+done0000.jpg

Thursday, May 9, 2013

Dark Chocolate & Strawberry Whipped Cream Cake with Chocolate Glaze


Wishing all the mothers a great Mothers Day!
This is a cake that leaves you feeling refreshed and light after eating.  Even the cream part alone is so yummy and irresistible. It is a chocolate cake with a light pink frosting(owing to the strawberries and the strawberry jello used), but it doesn't look pink in the photograph though. As I made this cake for a party and didn't have much time to spend on retakes, I let it be as it is.
I was a little apprehensive when I was making this frosting, as I thought that probably the jello and the strawberry flavor would overpower the whipped cream. But surprisingly though, it all combined well enough and turned out to be a wonderful treat.

Ingredients:
Chocolate cake (made 2 sheet cakes by doubling the recipe)
Strawberry Whipped Cream:
1 pint whipped cream
2-3 teaspoons strawberry gelatin
1 cup powdered sugar
4 tablespoons food processed strawberries(take some fresh strawberries, wash them, remove the stems, and throw them in the food processor until they become a thick, seedy liquid)
Method:
strawberry Whipped Cream:  Beat whipped cream until stiff peaks form.  Stir in gelatin and powdered sugar until desired taste is reached.
For the Glaze:
4 oz (115 g) high quality bittersweet chocolate, coarsely chopped
1/3 cup (76 g) unsalted butter, at room temperature and cut into cubes
Method:
Place the chocolate and butter in a medium heatproof bowl over a pot of simmering water. Stir the mixture using a rubber spatula until melted and smooth. *Be careful to not get even a droplet of water into your bowl of chocolate and butter.
Assembly of Cake:
Chill sheet cake in freezer for 30 minutes, or refrigerator for several hours. The cake will be a bit sticky, but should not be soft and fragile. If so, place in freezer or refrigerator again until more firm.
Using a sharp, serrated bread knife, cut the cake in half, then those halves in half--4 total. The pieces will be 11" long and about 4.5" wide.
Place 1st layer face-up (on a platter, or whatever you choose to serve the cake on), and spread about 1/2" thick layer of whipped cream on top. Repeat this step finally place your final layer face down.
Crumb Coat  cake with thin layer of whipped cream using a small offset spatula for the top and a straight offset spatula for the sides--if you have a metal bench scraper, you can run along cake to get smooth finish and to achieve sharp corners. Always start at the top of the cake, working your way down. Chill cake for about 30 minutes, or pop back in freezer for 10-15 more minutes to set cream.
Using  clean tools, add a thick layer of whipped cream on the top of the cake, working it over the edges and then finish the sides. Be very generous with your whipped cream, because you will be scraping most of it off with the scraper. It just makes it so much easier to get the smooth finish. Chill the cake for as long as you need, but at least 15 minutes to set the cream.
Drizzle your warm (but not hot) ganache over the top of your very chilled cake so it seeps down the sides. Be careful not to use too much, or you will lose your pink cake underneath! You can use your clean small offset metal spatula to smooth it over the top. Chill to set.

Wednesday, February 13, 2013

Mocha Chocolate Cake with Butter Mocha Frosting


Valentine's Day had always been just like any other day for me. But it all changed 12 years back. And even more so in the past 3 years. Some of you may be wondering about these numbers. So let me put to a rest all your questions before you come up with your on conclusions.  I had been married for 12 years, and being someone who always believed in love after marriage, Valentine's day had no special significance to me prior to that. And coming back to the significance of the number 3, it was 3 years ago on a Valentine's day that I started this blog - something that brought me friends from all around the globe. Though I don't say this often, I would like to thank all of those who visit me here and those who takes their time to comment. It is you guys who keeps me motivated. Love you folks- I am sure I won't be able to find a  better day to say that to you all.
This Mocha chocolate cake with butter mocha frosting is a perfect cake. If you are a mocha lover you will not be able to stop with just one slice.
Wishing all of you a Happy Valentines Day!
May this Valentine’s Day and all the coming days be filled with love, understanding, and contentment as you journey through life with those you hold dear.
Recipe source (cake): foodnetwork.com
Ingredients
Butter, for greasing the pans
1 3/4 cups all-purpose flour, plus more for pans
2 cups sugar
3/4 cups good cocoa powder
2 teaspoons baking soda
1 teaspoon baking powder
1 teaspoon kosher salt
1 cup buttermilk, shaken
1/2 cup vegetable oil
2 extra-large eggs, at room temperature
1 teaspoon pure vanilla extract
1 cup freshly brewed hot coffee
Butter Mocha Frosting recipe follows
Method:
Preheat the oven to 350 degrees F. Butter two 8-inch x 2-inch round cake pans or as I did one heart shaped pan and cupcake pan . Line with parchment paper or cupcake liners, then butter and flour the heart shaped pan. I made one heart shaped cake and 8 cupcakes with this batter.

Sift the flour, sugar, cocoa, baking soda, baking powder, and salt into the bowl of an electric mixer fitted with a paddle attachment and mix on low speed until combined. In another bowl, combine the buttermilk, oil, eggs, and vanilla. With the mixer on low speed, slowly add the wet ingredients to the dry. With mixer still on low, add the coffee and stir just to combine, scraping the bottom of the bowl with a rubber spatula. Pour the batter into the prepared pans and bake for 35 to 40 minutes, until a cake tester comes out clean. Cool in the pans for 30 minutes, then turn them out onto a cooling rack and cool completely.

Place the cake  flat side up, on a flat plate or cake pedestal. With a knife or offset spatula, spread the frosting.I used Bournvita crumbs to decorate the sides and piped the top with more frosting using a round tip

Butter Mocha Frosting
2 1/2cups  powdered sugar
1/2 cup unsweetened cocoa powder
1/4 teaspoon salt
1/4 cup butter, softened
1tbs hot water mixed with 1 tbs instant coffee
1 teaspoon vanilla extract
3 tablespoon sour cream
Method:
Combine powdered sugar, cocoa and salt in large bowl. Beat in butter with electric mixer on low speed. Gradually add coffee, vanilla and enough sour cream to make a smooth and spreadable frosting..


Sunday, December 30, 2012

Molten Chocolate Cake


With festivities happening all around us, I couldn't resist posting one more of holiday recipes from my draft; though I myself is not in  any shape to enjoy any of these. I am surviving for the past few days on kanji, apples and Horlicks. Yet I wanted to post this for the sake of my friends and well-wishers. Wishing and hoping for a better tomorrow - both for you and me!
Wishing you all a  new year which is better than  any so far.
Recipe source:Joy of Baking
Ingredients:
1/2 cup (113 grams) unsalted butter, cut into pieces
6 ounces (170 grams) semi-sweet or bittersweet chocolate, finely chopped
3 large eggs, separated
1/3 cup (65 grams) granulated white sugar
1 teaspoon pure vanilla extract
1/8 teaspoon cream of tartar
1 tablespoon granulated white sugar

Method:
Molten Chocolate Cakes: Preheat oven to 400 degrees F (200 degrees C) and place rack in center of oven. Generously butter and flour  four - 6 to 8 ounce (180-240 ml) molds, ramekins, or custard cups.Place the prepared molds on a baking sheet and set aside.
In a heatproof bowl, placed over a saucepan of simmering water, melt the butter and chocolate. Remove from heat and set aside while you beat the egg yolks.
Beat the egg yolks and 1/3 cup sugar until thick, pale, and fluffy. (When you slowly raise the beaters the batter will fall back into the bowl in slow ribbons.) Beat in the vanilla extract and then fold in the melted chocolate mixture.
In another clean bowl whip the egg whites until frothy. Add the cream of tartar and continue to whip until soft peaks form. Gradually add the 1 tablespoon of granulated white sugar and whip just until stiff peaks form. With a rubber spatula or wire whisk gently fold the beaten whites into the chocolate mixture, just until incorporated. Do not over mix or the batter will deflate. Divide the batter between the prepared molds. Bake for 10 to 15 minutes or until the outside edges of the cakes are set but the middle still looks a little wet and wobbly. You may have cracks on the top surface of the cakes.

Immediately remove from oven and let them rest for a minute or two. You can serve the cakes in their molds or you can run a palette or sharp knife around the edge of each cake and then invert onto the center of each serving plate. Carefully remove the mold. Sprinkle the top of each cake with confectioners sugar and place a dollop of softly whipped cream, clotted cream, creme fraiche, or vanilla ice cream on top of each warm cake.

Note: You can prepare the chocolate mixture several hours ahead of time. Simply make the recipe, pour into the prepared molds, cover with plastic wrap, and refrigerate.  Bake just before serving. When the batter is cold the cakes may take a minute or two longer to bake.

Makes four Molten Chocolate Cakes.

Wednesday, December 19, 2012

Christmas Fruit Cake


This is an alcohol free Christmas fruitcake that can be made with little advance planning. Typically for making fruitcakes you need to soak the fruits in rum at least  for 24 hours. But as this one doesn't use any rum, this can be enjoyed by teetotalers or even kids.
So if you were putting off starting the preparation for the Christmas fruitcake, and is panicking that now there is not enough time to get that perfect soak for the fruits, there is an alternative for you.
Recipe Source:Edible Garden
Ingredients:
1 cup plain flour
1/2 cup chopped cashewnuts
1/4 cup black raisins
1/2 cup mixed dry fruits (dates, cherries, orange peels)
1 + 1/2 cups white sugar
2/3 cup butter, at room temperature
3 eggs
1 clove + 1 cardamom pod + small piece of cinnamon + a pinch nutmeg (pound together to powder)
1 tsp baking powder
1 tsp vanilla extract
A pinch of salt
Method:
In a pan on medium heat, melt 1/2 cup sugar slowly. It will first melt and then turn dark brown . Keep stirring and let it turn a deep dark caramel color. Don't let it burn. Turn off heat and add about 1/4 cup water. The sugar will harden. Turn the heat back on and slowly heat the mixture until the sugar crystals dissolve. This will take around 10 mins. Let this cool and set aside.
Pre-heat oven to 350F / 180C.
 Add 3 tbsp flour to the dry fruits and nuts and completely coat the nuts and fruits with flour. This is done to prevent  them  from sinking to the bottom of the cake  while baking. Set aside.
Mix the remaining flour and baking powder, spices, and salt until well combined.
Beat the butter and 1 cup sugar until fluffy - about 10 mins by hand, 3-4 mins with an electric beater. Add vanilla and mix until combined. Add 1 egg and beat. Then add a bit of the flour mixture and fold. Likewise, alternate between the eggs and flour mixture until they are used up.
 Add the cooled caramel  fold in and finally add dredged fruits and gently fold in. Pour batter into a greased cake pan and smooth the top.
 Bake for 50-55 mins until the top turns a dark brown and when a skewer inserted into the cake comes out with dry crumbs. You can start checking from 45 mins on wards The top will look like it's overdone but don't worry, make sure the inside is also completely cooked.

Tuesday, September 4, 2012

Pineapple Cream Cake


Jay turned one more year younger today ;) He just wanted a biriyani for his special day, but the baker in me could not let go another chance to bake a cake. Since this was to follow a heavy meal, I wanted to make something light and thought of this pineapple cream cake. I haven't made this in a long time and I knew Jay loves it. For anyone looking for a light and refreshing cake, look no further.
Happy Birthday, Hubby Dear :*

Ingredients for the cake:
3 cups sifted cake flour
3 1/2 teaspoons baking powder
1/2 teaspoon salt
3/4 cup  unsalted butter, room temperature
1 1/3 cups  granulated white sugar
6 large egg yolks
1 cup milk
2 teaspoons pure vanilla extract

Method:
 Preheat oven to 350 degrees F (180 degrees C). Grease two 9 x 2 inch  cake pans.
 Sift or whisk the flour with the baking powder, and salt.
 Beat the butter until soft and creamy (about 1-2 minutes). Gradually add the sugar and beat until light and fluffy (about 3-5 minutes). Add egg yolks, in two batches, beating well after each addition. Scrape down the sides of the bowl as needed. Add the vanilla extract and beat until combined.With the mixer on low speed, alternately add the flour mixture (in three additions), and milk (in two additions), beginning and ending with the flour.
Evenly divide the batter between the prepared pans, smoothing the tops with an offset spatula or back of a spoon. Bake 22 to 28 minutes or until a toothpick inserted into the center of the cake just comes out clean and the cake springs back when pressed lightly in center.

Place the cakes on a wire rack to cool, in their pans, for about 10 minutes. Then invert the cakes onto a greased rack. To prevent cracks, reinvert cakes so that tops are right side up. Cool completely before frosting.

Ingredients for the frosting and filling:
Heavy whipping cream – 400ml
Icing Sugar – 3-4 Tbsp
Pineapple Extract – 1 tsp
Pineapple cut bite size –1 cup
Method:
Beat the heavy whipping cream,pineapple extract and sugar together until it forms stiff peaks.

Final assembly of thecake.
On the first cake  sprinkle some pineapple sugar syrup(Prepare pineapple sugar syrup by mixing pineapple juice and sugar).
Spread whipped cream and top it with pineapple pieces.Put the second cake on top of first and sprinkle with pineapple syrup.Now frost the top and sides of the cake with the remaining  cream. And decorate with pineapple slices and cherry.Refrigerate for a few hours before serving.

Friday, August 24, 2012

Chocolate Overload Cake


Today is Aishwarya's birthday. She wanted an overdose of chocolate in everything on her special day. She wanted her lunch all chocolaty - with Nutella sandwich, chocolate brownies, chocolate dipped strawberries and chocolate milk to wash it all down with !! And she wanted her birthday cake to be a chocolate cup cake with chocolate frosting. This is what I came up with - with an overload of chocolates to please my little darling.
This has milk chocolate, dark chocolate and white chocolate in it. The birthday girl hasn't seen this yet. I am keeping my fingers crossed that this Chocolate Overload would satisfy her craving for chocolate.

Chocolate Whipped Cream:
Ingredients
1/2 teaspoon pure vanilla extract
3 - 4 tablespoons (35-50 grams) granulated white sugar, or to taste
2 tablespoons unsweetened cocoa powder (regular or Dutch processed)
1 cup (240 ml) cold heavy whipping cream
Method:
 Place your mixing bowl and wire whisk in the freezer for about 15-30 minutes. Place the vanilla extract, 3 tablespoons of sugar, and cocoa powder in the cold bowl. Stir in about 2 tablespoons of the cream to form a thick paste (this will dissolve the cocoa powder). Then add the rest of the cream and beat just until stiff peaks form. If not using immediately, cover and refrigerate. Makes about 2 cups (480 ml) whipped cream

Chocolate Butter:
Ingredients:
200gm butter
200gm dark chocolate ,chopped
Method:
Combine chocolate and butter in a pan and stir over low heat.When the chocolate melts and the mixture is smooth,cool until mixture becomes spreadable.

Chocolate Strips:
2 cups White chocolate,chopped
Method:
Cut strips of baking paper the height required.  Melt the chocolate in two batches.I used the microwave and microwaved the chocolate for 20 second increments stirring at the end of every 20 seconds. take a small amount of white chocolate and spread it out over the baking paper strip using an angled spatula.  Once the chocolate starts to set  cut the chocolate into strips.

Chocolate Curls:
Milk chocolate,shaved into curls using a sharp knife

Chocolate Cake carved in the shape of a cup cake

Method to assemble:
Slice the cake in half horizontally. If you want your cake to be moist, you may drizzle some sugar syrup over the cake. Apply a layer of chocolate butter followed by a layer of chocolate whipped cream over the bottom layer. Now place the upper layer on top of it and and apply the whipped cream frosting all around the cake. Place the chocolate strips around the cake. Now pipe the top of the cake with chocolate butter and decorate it further with chocolate curls.
Related Posts Plugin for WordPress, Blogger...